
TL;DR
Moving your rig into a closet or another room is the most effective way to reduce noise. Acoustic treatments like foam help control reflections but won’t block sound leaks—sealing gaps and proper placement matter more. Ventilation is key when placing a hot rig in a confined space.
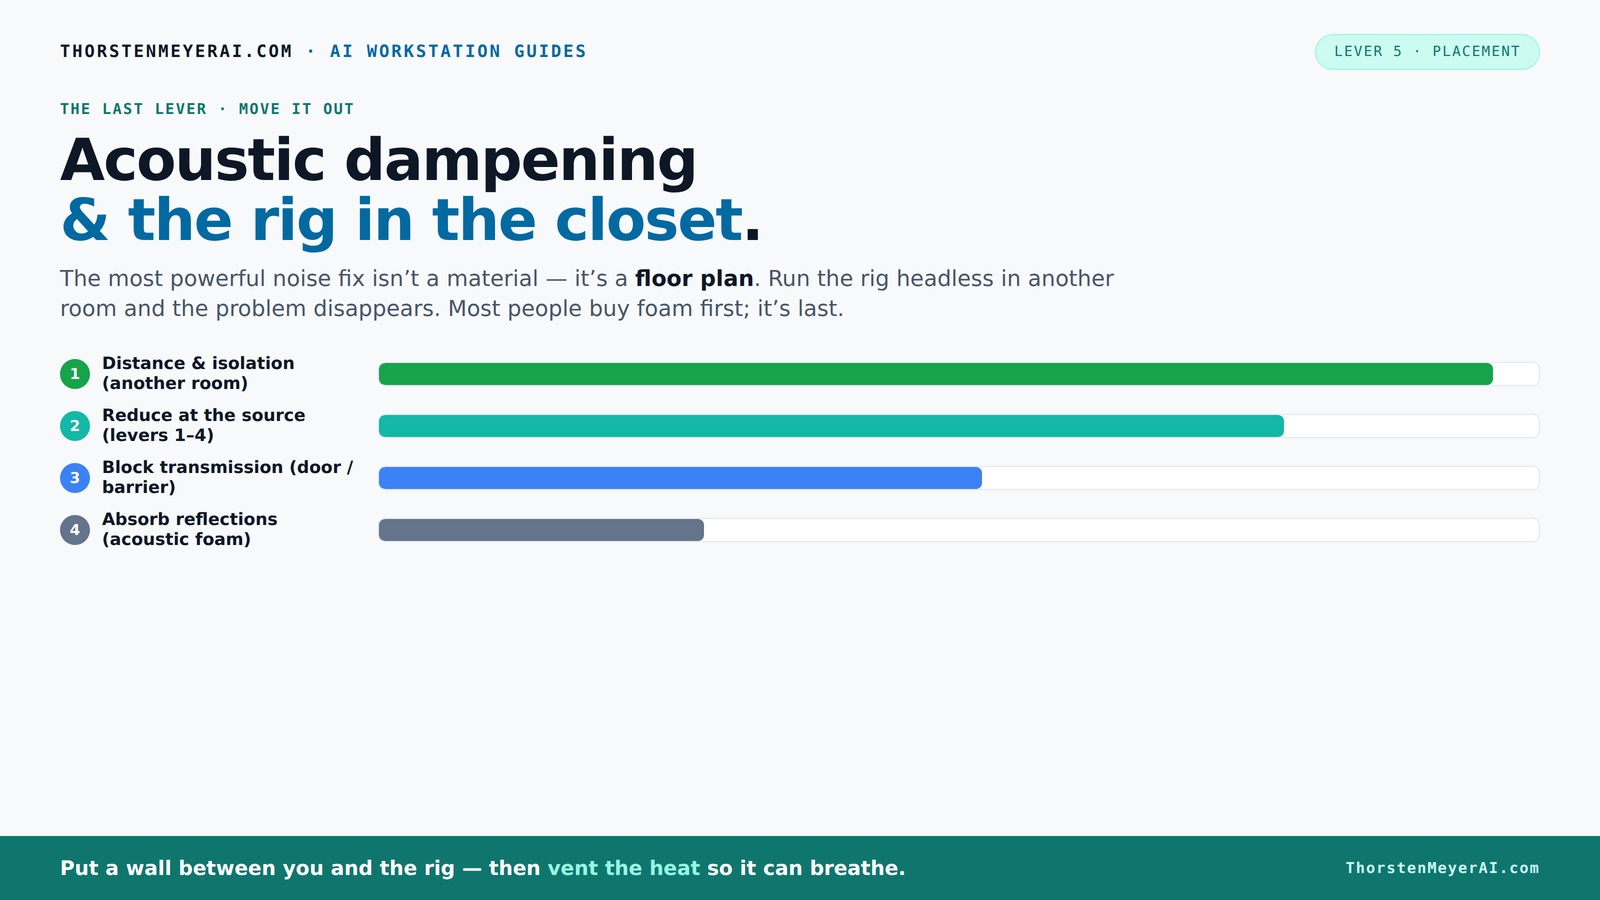
Acoustic dampening
& the rig in the closet.
The most powerful noise fix isn’t a material — it’s a floor plan. A rig you can’t hear because it’s in another room beats any amount of foam. Tap the approaches in Part 1 to see what actually works.
(another room)
(levers 1–4)
(door / barrier)
(acoustic foam)
Contain the noise, not the heat
Key Takeaways
- Moving your noisy rig into another room is the simplest way to cut noise dramatically.
- Acoustic dampening inside a closet improves sound quality but does not fully block sound leaks—sealing gaps is essential.
- Ventilation is critical to avoid overheating when placing a high-power rig in a confined space.
- Treat first reflection points—behind the mic, ceiling, and side walls—with foam or blankets for clearer recordings.
- Sealing the door with weatherstripping or blankets can reduce sound leakage by over 70%.

24 Pack Black 12 x 12 x 2 Inches Pyramid Designed Acoustic Foam Panels, Sound Proof Foam Panels for Walls, High Density and Flame-Retardant Acoustic Panels, Sound Panels for Recording and Home Studio
Exceptional Sound Absorption:These pyramid acoustic panels are engineered to effectively absorb sound waves, reducing echo and reverberation. With...
As an affiliate, we earn on qualifying purchases.
As an affiliate, we earn on qualifying purchases.
Why Moving Your Rig Beats Buying More Foam
Moving your noisy machine into another room is the fastest, most effective way to cut down sound. Think about it: if you’re not near the source, you don’t hear it. A rig in another room, connected via wired or strong Wi-Fi, leaves your workspace silent. It’s a simple switch that’s often overlooked but makes all the difference.
Imagine your GPU tower humming loudly in the corner—then picture it tucked away in a closet across the hall. The noise drops dramatically. This approach isn’t just about silence; it’s about reducing stress on your ears and your neighbors. Plus, it frees you from the endless battle of trying to soundproof a noisy box.

Focusound 52 Pack Acoustic Foam Panels 1" x 12" x 12" Sound Proof Foam Panles Soundproofing Noise Cancelling Wedge Panels for Home Office Recoding Studio with 300PCS Double-Side Adhesive
Soundproofing - Acoustic foam panels triangular grooves structure for better noise absorption, helps to reduce and absorb unwanted...
As an affiliate, we earn on qualifying purchases.
As an affiliate, we earn on qualifying purchases.
The Truth About ‘Rig in the Closet’: It’s Not Just About Quieter Noise
Placing a rig inside a closet sounds ideal—noisy machine, quiet room. But here’s the catch: heat. A sealed space traps heat, turning your closet into a sauna for your hardware. Without airflow, your GPU and CPU will throttle back or even shut down from overheating.
To make a closet work, you need active ventilation. Think of it like a mini HVAC: a quiet exhaust fan pulling hot air out and fresh air in. When done right, you get a silent, cool rig that runs full blast without frying itself. Check out this guide for detailed ventilation tips.
Beyond cooling, proper ventilation also influences sound quality. Good airflow can prevent the buildup of heat-induced vibrations and reduce the risk of thermal expansion, which might cause minor structural shifts that alter acoustic properties. Balancing noise reduction with effective cooling is a nuanced tradeoff—too much airflow noise defeats the purpose, so choosing quiet fans and strategic ducting is essential.

Professional Studio Recording Microphone Isolation Shield, Pop Filter,High density absorbent foam is used to filter vocal. Suitable for Blue Yeti and other condenser microphones (AO-504 With Stand)
♪【The package contains】♪: Microphone Isolation Shield x 1, Metal Thread Adapter x 2 (Adapt most microphones), Adjustable Stand...
As an affiliate, we earn on qualifying purchases.
As an affiliate, we earn on qualifying purchases.
Soundproofing vs. Acoustic Dampening — What’s the Difference?
Most people think foam or blankets will soundproof their closet. Not quite. Acoustic dampening reduces echoes and reflections inside the space, making recordings clearer. Soundproofing, on the other hand, blocks sound from escaping or entering. It’s about sealing gaps, adding mass, and isolating vibrations.
For example, a blanket on a closet door might soften sound reflections but won’t stop loud noise from leaking outside unless you seal gaps or add mass. If your goal is to record vocals, dampening helps shape the sound. If you want your neighbors to hear nothing, soundproofing is the goal.
Understanding this distinction is crucial because many assume foam alone can block sound, which isn’t true. Effective soundproofing involves multiple layers—mass, damping materials, and airtight seals—while dampening focuses on internal reflection control. Choosing the right approach depends on your specific needs: clarity versus isolation. Often, a combination of both yields the best results, but knowing what each does helps you prioritize your efforts and budget wisely.

HomeProtect Door Draft Stopper 36 Inch Under Door Draft Blocker Door Sweep for Bottom of Door Reduce Cold Air, Soundproof, Light, Odor, Weather Stripping Door Seal Strip Fit for Interior/Exterior
[Affordable]Single-side door draft stoppers are generally less expensive than double door draft stoppers. Our door draft stopper is...
As an affiliate, we earn on qualifying purchases.
As an affiliate, we earn on qualifying purchases.
Where to Place Absorption Materials for Best Results
Placement is king in a closet booth. The first step: position your microphone away from hard surfaces and reflectors. The next: treat the areas that bounce sound back—mainly behind the mic, the ceiling, and side walls. Use foam, blankets, or acoustic panels with a few inches of air gap for better absorption. For more on acoustic treatments, see this guide.
For example, hanging blankets a few inches off the wall behind your mic can significantly reduce reflections and echo. Corner bass traps target low-frequency buildup, preventing that ’boxy’ sound. Experiment with placing absorption near the mic, on the ceiling, and in corners for the clearest recordings.
Strategic placement of these materials makes a profound difference because it directly affects how sound waves interact within the space. Properly positioned absorption reduces early reflections that can muddy recordings, while bass traps manage low-frequency buildup that causes muddiness and resonance. The tradeoff involves balancing absorption and diffusion to maintain a natural, lively sound without excessive deadness. Testing different placements and listening critically helps you find the sweet spot for your particular setup.
Sealing the Door — Your Weakest Link in Soundproofing
The door is the biggest leak point in a closet setup. Gaps, cracks, and hinges let sound escape like water through a sieve. The fix: weatherstripping, acoustic sealant, or heavy blankets draped over the door. For serious sound isolation, consider a door sweep or even replacing the door with a solid-core option.
Imagine sealing every crack in a closet door—suddenly, your noise leaks drop by over 70%. The extra effort pays off when combined with internal damping and ventilation. Don’t forget: sealing the door is often the cheapest and most effective upgrade you can make. It’s a simple yet powerful step because even small gaps can significantly undermine your entire soundproofing effort. The tradeoff is cost versus effectiveness; high-quality seals and solid-core doors can be expensive but dramatically improve isolation.
Treat the Ceiling and Floor — Why It Matters More Than You Think
People often forget about the ceiling and floor when acoustic treating a closet. But sound doesn’t just bounce horizontally; it also reverberates above and below. Hanging rugs or blankets from the ceiling can cut flutter echo and harsh reflections. Thick carpets or foam mats on the floor absorb sound and prevent it from bouncing back. For more tips on acoustic treatments, visit this resource.
For example, a simple hanging quilt or thick blanket overhead can make vocals sound warmer and less ‘boxy’. Similarly, a rug under your chair or a foam pad on the floor reduces low-frequency standing waves that create a boomy sound. These treatments help create a more balanced acoustic environment, preventing sound from bouncing in unwanted directions and causing muddiness or harshness. The tradeoff involves adding enough absorption to tame reflections without deadening the space, which can make recordings sound unnatural.
How to Fine-Tune Your Closet Setup in 3 Easy Steps
- Identify reflection points: Place the mic and listen for echoes. Treat the walls, ceiling, and floor where sound bounces most.
- Seal all gaps: Use weatherstripping, acoustic sealant, or blankets on the door to block leaks.
- Ventilate effectively: Install a quiet fan or duct system to keep your rig cool without sacrificing silence.